QuickService user guide
Complete admin tasks and get answers or specialist support faster, through a single electronic front door for service and operational queries. With QuickService you can access pre-populated electronic forms, initiate service requests, and monitor all your open queries.
Empower
A single electronic front door for all your service needs empowers each of your team members to access the forms, information, and expertise they need to get their tasks done. QuickService creates consistency and can eliminate the need for different processes for different types of enquiries.
Accelerate
QuickService gives you back the time and resources taken up by managing service requests. You can view the live status of any open request at any time, as well as a full record of all service requests and admin tasks completed through the platform.
Using QuickService for status updates instead of making follow-up calls and sending emails also frees up more time creating efficiencies. Service requests reach your GTS Service Team directly, and if you have appropriate notifications set up, you will receive email advice when a request is created, requires your action, or is completed.
Monitor effortlessly
The Requests Dashboard in QuickService shows you service request statuses:
- Draft – service requests that have been created by you but not yet submitted
- Loaded – service requests that have been submitted, but are not yet assigned
- In progress – currently being resolved
- Pending action – where your action or approval is needed
- Completed – request resolved (you may also have received an email if you have notifications enabled)
- Following – items you have flagged
You can also use the search bar to find specific service requests quickly.
What you'll find in this guide
This Client User Guide provides instructions on how to:
- Log in to QuickService
- Create a service request
- View and manage outstanding requests
- Establish and manage users and controls (administrators)
Logging in
QuickService is web based, and all users require a valid QuickService login to use the application. User access is managed by your administrators.
Navigate to quickservice.westpac.com.au to log in.
First log in
We will give your administrators their login name and temporary password. Administrators can then create login names and temporary passwords for additional users in your organisation.
-
On first login, enter the temporary password.
-
The Change Password screen will display, and prompt you to change your password to a new one.
-
You will also be prompted to set up SMS reset password.
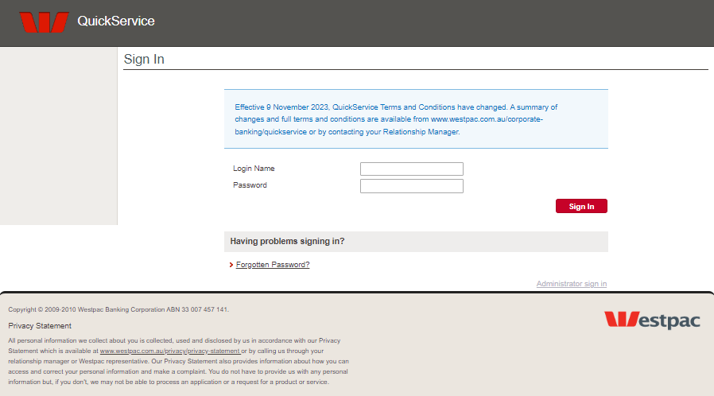
Each time you log in, you are allowed five unsuccessful attempts before your user profile is locked. If this happens, your administrator can reset your profile.
Your password
Password requirements
Your password must contain at least 14 characters, including at least 1 letter and at least 1 number. Your password must change every 42 days and cannot be the same as a previous password.
Changing your password
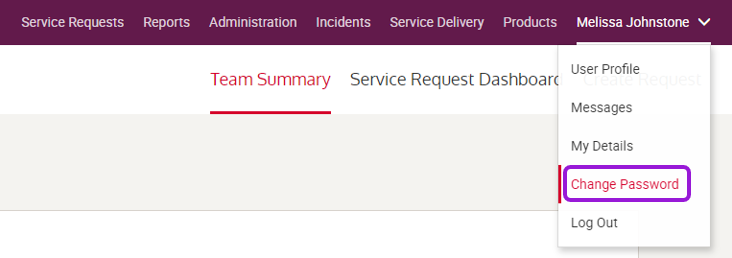
You can change your password at any time; however, you will be prompted to change it after 42 days. To change your password:
-
Select the User Menu drop down in the top right corner.
-
Select Change Password.
-
Enter your current password once, and your new password twice then select 'Save'.
Resetting your password
You can reset your password by SMS if you set that up on your first login. Otherwise your administrators can reset your password.
SMS password reset
On your first login you will be prompted to set up SMS reset. You will be asked to enter your mobile number and date of birth.
You can establish this at a later date, or update your mobile number, by logging in and navigating to the User drop down menu > My Details > Edit.
When you select  on the login screen you will have the option to reset your password by SMS code. Follow the steps below to reset your password.
- Input your Login Name and date of birth to generate the SMS code.
- Enter the SMS code on the next screen.
- Input a new password.
- Select 'Submit'.
Administrator password reset
If you haven't set up SMS password reset, or your user profile is locked, you will need to contact your administrator to reset your password. They will generate a temporary password, similar to when you log in for the first time. When you input your temporary password, you will be prompted to enter a new password and confirm it.
Corporate online single sign on
Users who have access to both QuickService and Corporate Online (and use their 8-digit customer number to log in) will have the ability to access QuickService via Corporate Online. To set this up, a user should navigate to the QuickService link in Corporate Online. They will be required to enter their login and password – thereafter sign in will be automatic.
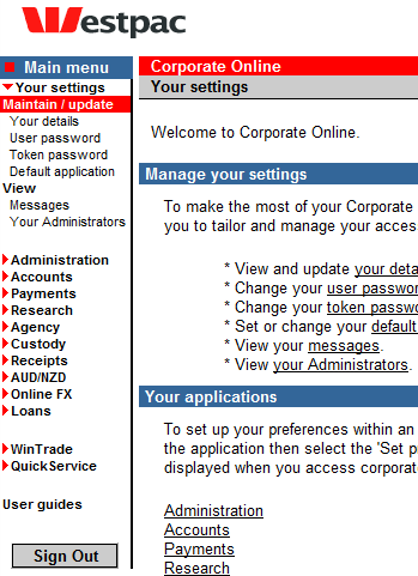
To link your Corporate Online 8-digit customer number to your QuickService profile:
- Select the 'User Menu'.
- Select 'Administration' from the drop-down menu.
- Then select 'My Profile' from the Administration menu on the left-hand side.
- Enter your Corporate Online 8-digit customer number.
- Select 'Save' to continue.
Navigation

QuickService has a top navigation bar to switch between different views, and a secondary bar for actions. The top navigation bar includes:
- Service Requests – view service requests (and managers can view a dashboard for their whole team).
- Dashboard – create and view service requests (and managers can view a dashboard for their whole team).
- Administration – set or amend your user settings, reset your password, opt in or out of notifications, etc.
- Support – view QuickService support documents, technical assistance, and access links to your online banking portal.
- Products – view information relating to your PPS, BPAY and Direct Entry facilities.
The secondary menu options will change as you switch between views. It shows all the actions you can take based on your role entitlements.
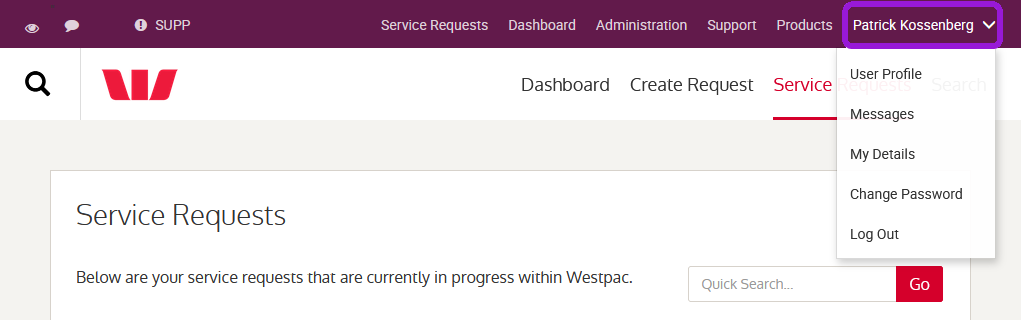
There is also a user drop-down menu housed within the top navigation bar that includes the following options:
-
Messages – for in-system messages about scheduled maintenance, updates, and outages
-
My Details – set or amend your personal details, such as your mobile number
-
Change Password – change and save a new password
-
Log Out – log out of your account
Create service requests
To create a service request follow the steps below:
-
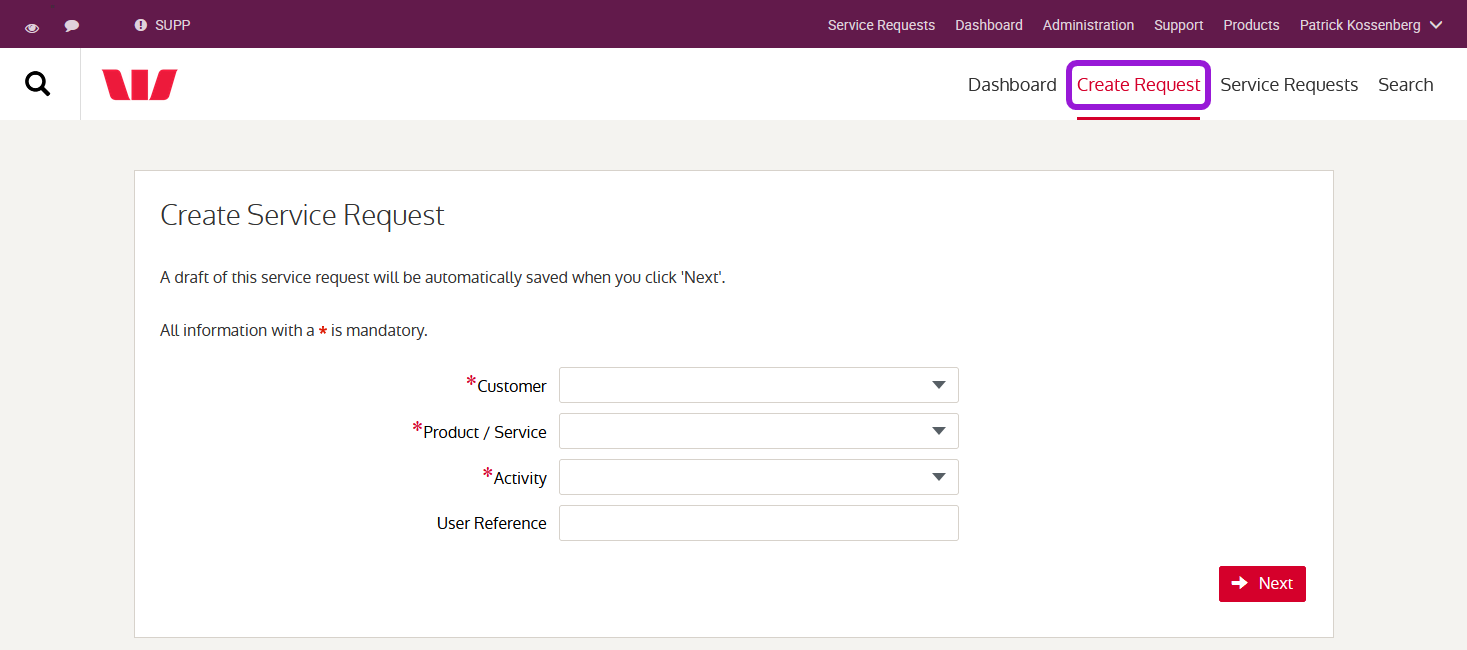
Select 'Create Request' in the secondary menu. The 'Create Service Request' page will display.
-
Enter your selections.
These selections determine how your request is routed to the most appropriate specialist to provide resolution. If you are uncertain about any of these selections, please speak with your Westpac contact who can clarify.
Field Requirement Customer Applicable where you have more than one legal entity linked to your profile. From the drop-down list, select the legal entity that the service query relates to. Product / Service Select the product or service from the drop-down list. Activity Select the relevant activity from the drop-down list. The options for Activity will depend on the product or service selected above.
Common options include:- Establish / Create - A request to establish a new instance of a product or service you already have, for example, additional accounts, DE facilities, etc.
- Amend - A request to make changes to existing products or services
- Enquire - An enquiry about product or service details or other information
- Cancel - A request to cancel an existing product or service
User reference You may choose to add an internal identifier to help monitor and manage requests. -
Select 'Next' to continue.
-
Input the details of your service request in the free text box, 'Action Notes'.
-
Select 'Finish' to proceed to the next screen.
-
Attach any supporting documentation to your request.
-
The Service Request page loads with a status of 'Awaiting Documentation'. At this stage you can:
- Delete the request
- Add an attachment
- Add a comment
- Submit the request – documentation may not be required in every instance
-
Once you select Submit, the Service Request page displays, with the status 'Loaded'. The request has been queued for action.
Attaching documentation to a request
You can attach commonly used document or image file types to any service request, both when you create the service request, and at a later date by selecting the individual service request.
Accepted file extensions include the following:
| Images | Documents | Spreadsheets |
|---|---|---|
| .png | .xls | |
| .tiff | .doc | .xlsx |
| .tif | .dot | |
| .jpeg | .docx | |
| .gif | .txt |
When additional information is required
Occasionally, Westpac will require additional information. Depending on your notification settings, you will receive an email with the subject 'Pending Action – QuickService Request', prompting you to log in to QuickService to view more details.
To add more information to a request you have submitted in QuickService:
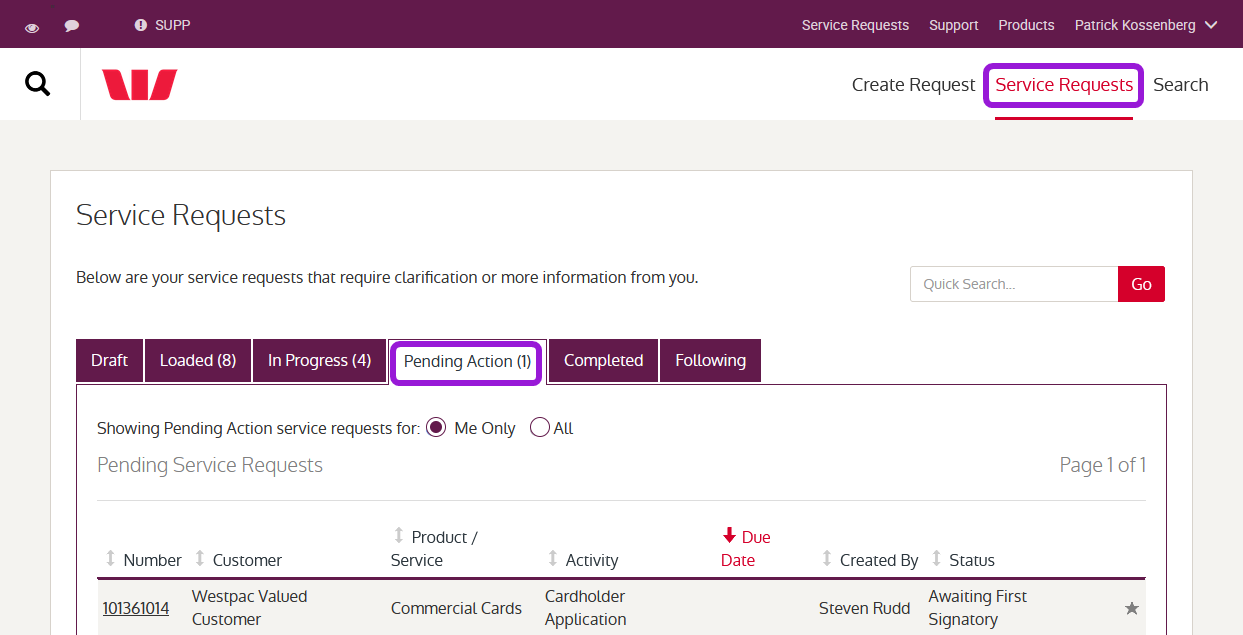
-
Select 'Service Requests' from the secondary menu under 'Service Requests' or 'Dashboard'. The 'Service Requests' screen will display tabs with various statuses.
-
Select the 'Pending Action' tab.
-
Choose a service request from the list to display the details. The text of your original request will appear at the top, for reference. Below, there are tabs where you can view:
- The full history of the request
- The comments relating to the request
- Attachments
- Changes in the status of the request
The request for additional information will appear in both the Full History tab and the Comments tab.
-
Select 'Add Attachment' or 'Add Comment' where applicable.
-
Select 'Send Reply to Westpac' to add additional information in free text format.

View and manage service requests
QuickService is your essential tool to view, monitor, and manage all your outstanding service requests. It provides you with the same view of each request that your Client Development Associate has. This will save time for you and your team by reducing follow-up calls and emails for updates as you will have all the relevant information to hand.
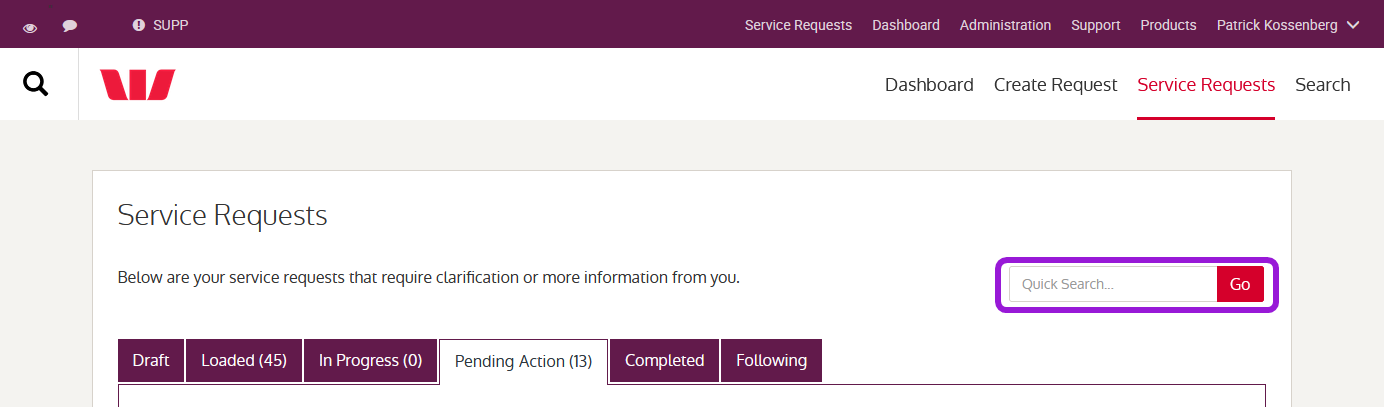
You can view any service request that you have created, from draft to completed, by selecting 'Service Requests' in the secondary menu. There are six tabs in the Service Requests view:
Draft – requests you have created but not yet submitted
Loaded – requests you have submitted, ready for Westpac to action
In Progress – requests that Westpac is currently working on
Pending Action – requests that need additional information to progress
Completed – requests that have been completed
Following – requests that the user has flagged to monitor closely so they can track updates more easily, particularly if they have not logged it themselves
You can select any individual request and view the request's details. You can also sort or filter each view of requests by:
- Number
- Customer
- Product / Service
- Activity
- Created date / Due date
- Created by
- Status
The Loaded and In Progress tabs also allow you to toggle between displaying all the requests for your team, or just the requests owned by you.
Search for a service request
You can use Quick Search when you know the service request number.
Quick Search
The Quick Search bar appears at the top of the Service Requests view. You can enter the Service Request Number here to take you directly to the specific request.
Advanced Search
You can use Advanced Search to find a request using a range of variables.
-
Select 'Search' from the secondary menu under 'Service Requests'.
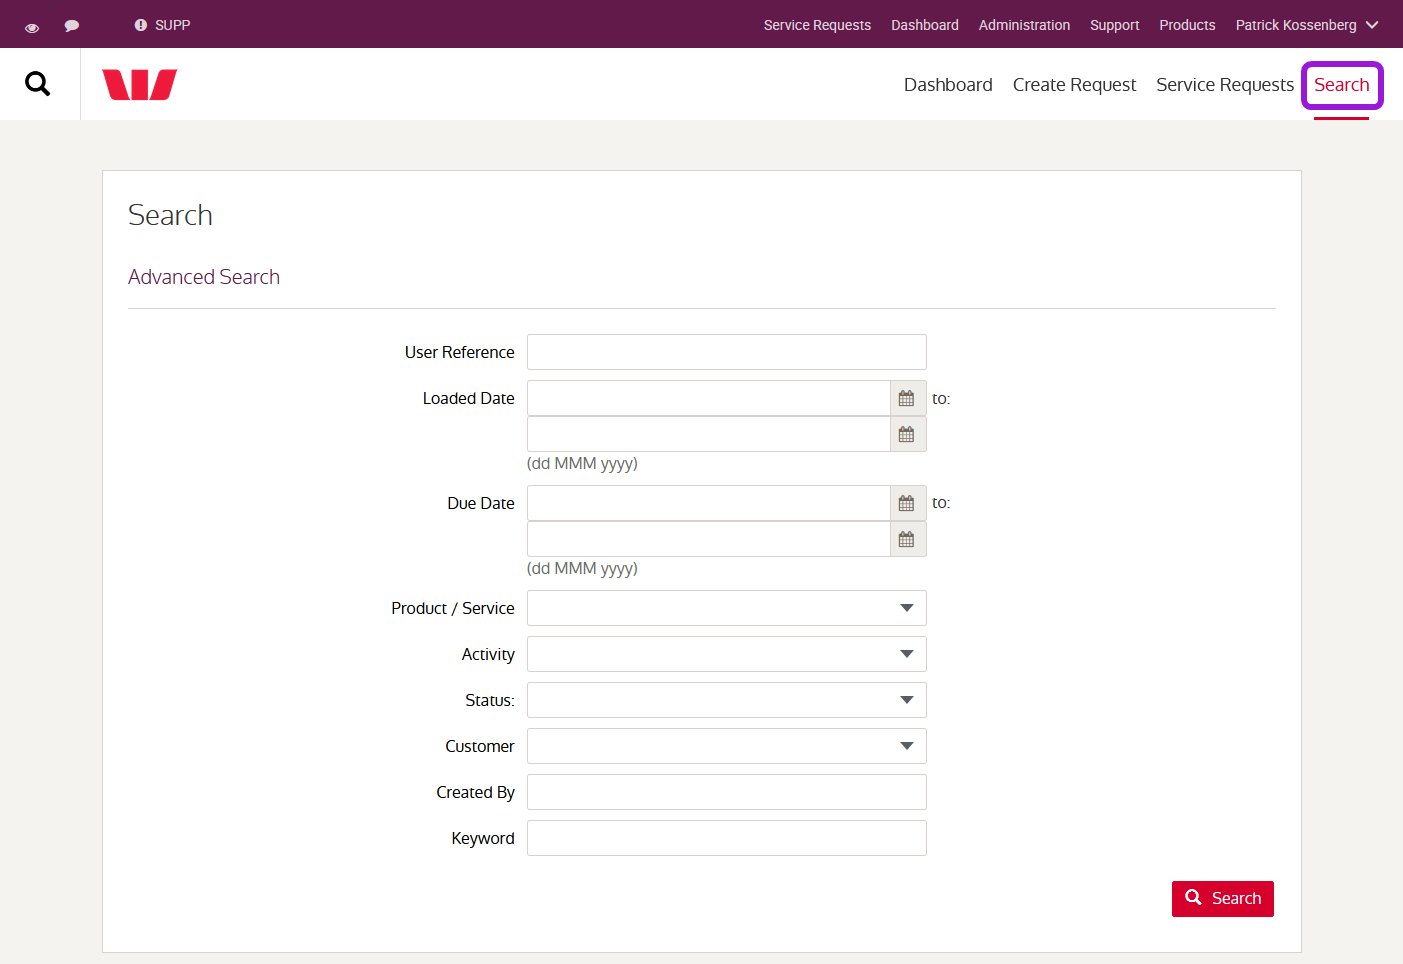
-
Input the identifier in the first field, if applicable. ('User Reference' is for any internal identifier that you may have input when creating the service request).
-
Select continue and the screen will refresh to display all service requests that meet your search criteria.
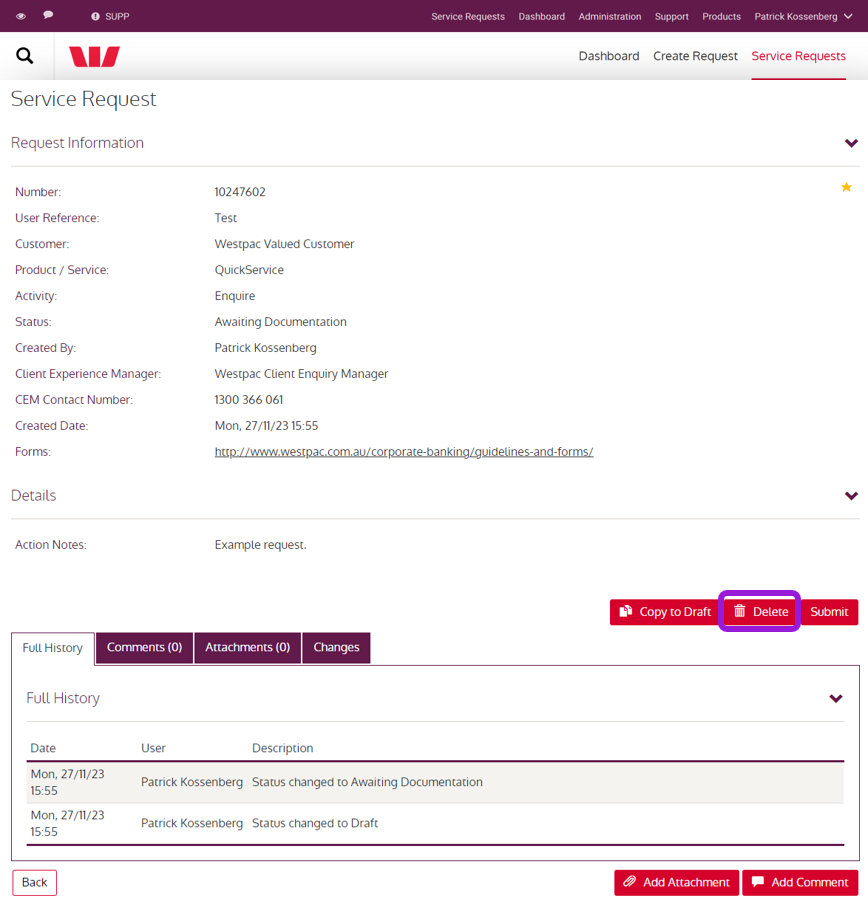
Cancel or delete a request
You can delete any service requests with the status 'Awaiting Documentation' or 'Draft'. Your Client Development Associate must cancel any requests that have already been submitted to Westpac.
Delete
- In the request information section of the Service Requests screen, select 'Delete'. The Delete Service Request window will display.
- To confirm, select 'Delete'.
Cancel
Cancel a service request that has already been submitted by simply adding a comment to the live service request. This will be routed through to the relevant team or service manager.
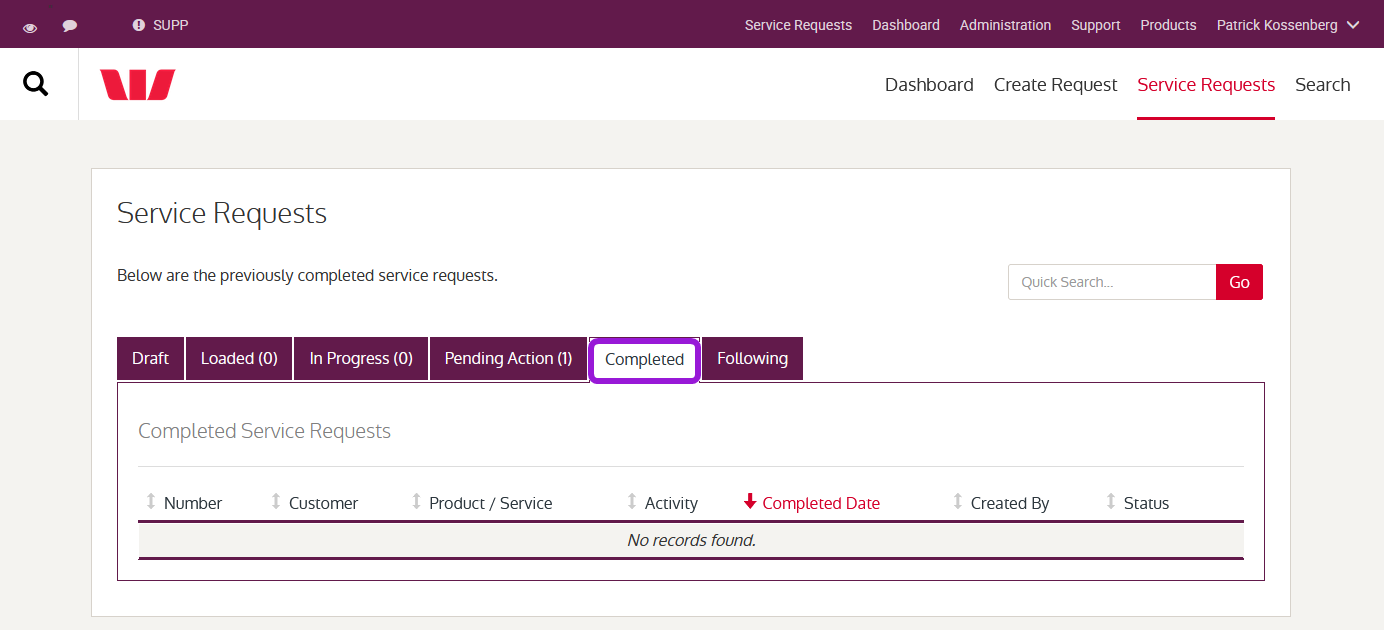
Completed requests
Once a service request is completed, Westpac will send an email to the user who created the request with confirmation (unless you have opted out of email notifications). Additionally, the Completed tab of the Service Requests screen displays all previously completed requests.
You can view the details of these requests by selecting the service request number.
QuickService administration
Your administrators can access additional functions by switching to 'Administration' from the top menu.
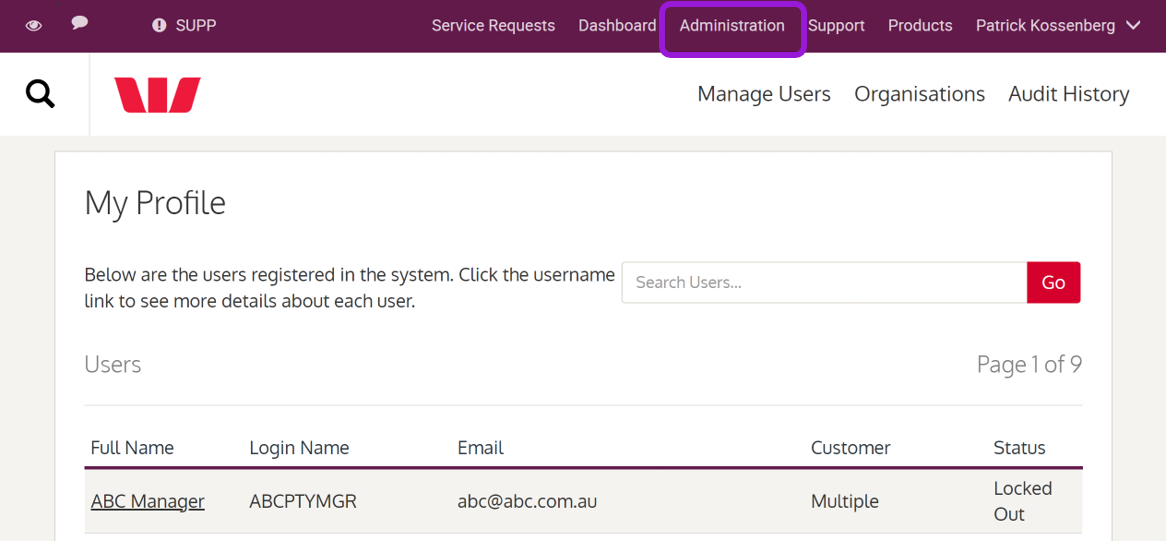
There are three menus in the 'Administration' view.
| Field | Requirement |
|---|---|
| Manage users | Provides an overview of all users within your QuickService portal. On this page you can create new users, amend existing users, reset passwords, disable user access, and export a list of users in a .csv file. |
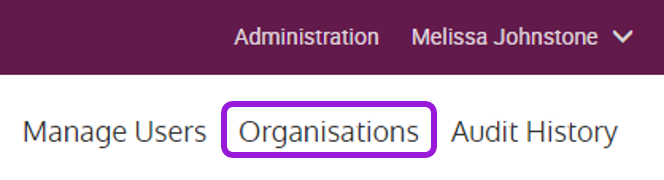
| Organisations | Provides an overview of all legal entities within your QuickService portal. On this page you can opt in or out of selected email notifications and define the selectable list of products and services available to users when creating service requests for each entity. |
| Audit history | Provides a record of administrative changes made at a user level or entity level. |
Manage users
Manage access and functionality available to each user.
Customer user entitlements
A user may have multiple entitlements assigned to their profile and have various user entitlements per entity. The below user entitlements provide you with a detailed description and understanding of each entitlement.
| Role | Description and Functionality | |
|---|---|---|
| Administrator | The Administrator entitlement allows the User to manage QuickService to configure user access and entitlements. Users with this entitlement can do the following:
Should they wish to be able to view or create a Service Request, they must have Manager / Team Member entitlement assigned to them also. Please note, Administrators will not be able to manage their profile and must be managed by Westpac. To appoint Administrators you must complete the 'QuickService Establishment Form' for each entity the nominated entitlement is to be applied to. |
|
| Manager | The Manager entitlement allows the user an overall view of service requests raised by all users under the organisations they have been assigned that entitlement to. They have the ability to create service requests and update service requests. The Administrator can create new users and appoint the Manager entitlement to the user for each entity they have authority to do so. | |
| Team Member | The Team Member raises service requests and view and update own service requests. The Administrator can create new users and appoint the Team Member entitlement to the user for each entity they have authority to do so. | |
Create new user
Administrators can create additional users with the role and entitlements of Team Member and Manager. Managers have access to a dashboard of service requests for their entire team. To create a new user you will need to input the following details:
| Field | Requirement |
|---|---|
| Login name | Unique user identifier must be letters and numbers only. No spaces or special characters. Cannot be modified – please ensure the login name is correct before saving. |
| Full name | User's full name |
| User's email to receive notifications | |
| Phone | User's contact number |
| Mobile | Used only for SMS password reset - Optional, can be added at a later date |
| Date of birth | Used only for SMS password reset - Optional, can be added at a later date |
| Customer | List of entities for which the user can create and manage service requests |
| Role | The entitlement the user requires (per entity) – Team Member or Manager |
Once you have entered all required details, select 'Save'. A temporary password will be generated for the new user and displayed on screen. This password isn't automatically sent to the new user, so you will have to provide it to them. The new user will be prompted to change this password on their first sign in.
There are additional user roles with specific responsibilities that can only be created and administered by your Client Development Associate. These roles are Administrator, Signatory and Verifying Officer.
There is no limit to the number of users who have 'Administrator' entitlements, however each entity must have at least one.
Edit user
Administrators can amend the user details, as well as their entitlements. All fields are editable except the login name. Entitlements are provided at entity level. A user may be a Team Member for one entity and a Manager for another.
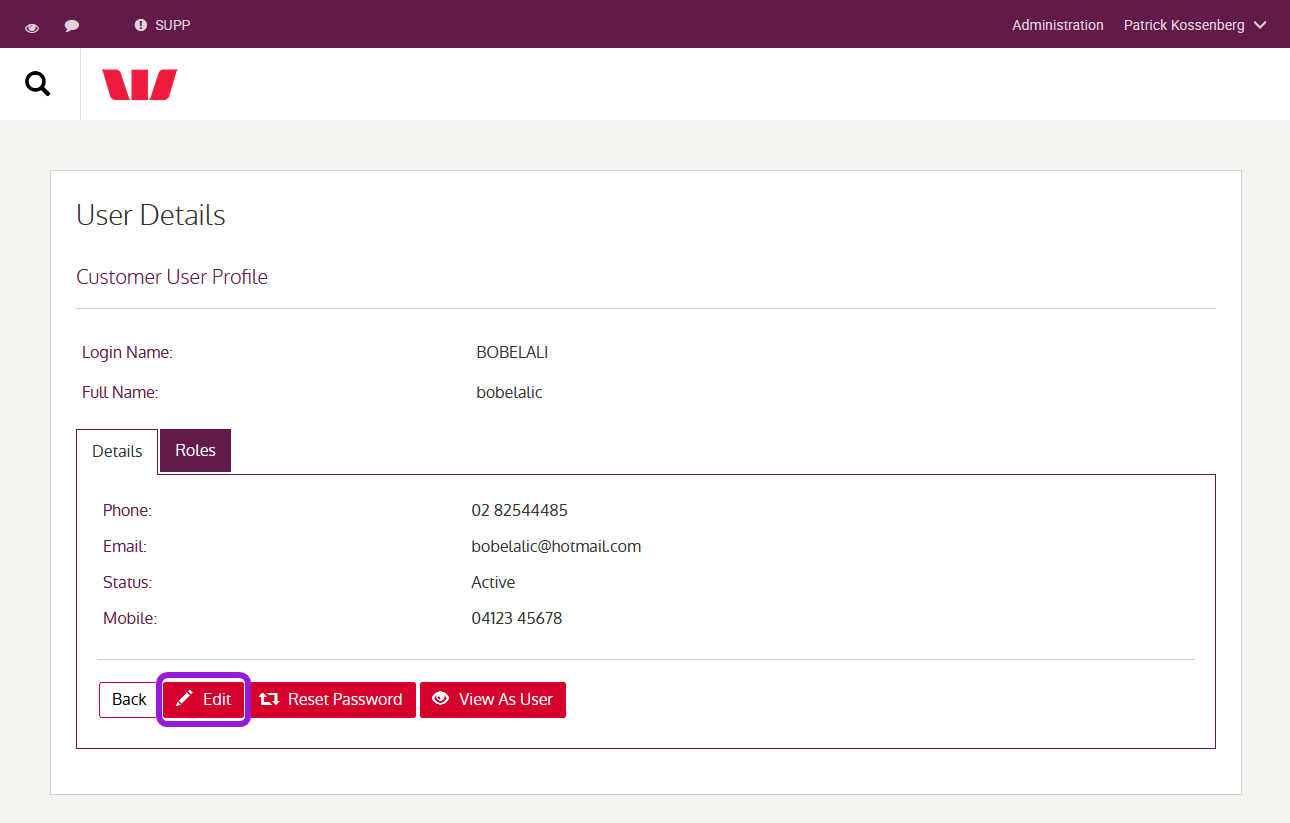
You can remove entitlements in relation to a specific entity by selecting the bin icon in the last column of each applicable entitlement.
Reset user password
Administrators can change their own password from the Change Password menu, just like any user. They can reset other users' passwords, or unlock user profiles, from the Manage Users menu.
Disable user
You can disable any user's access and entitlements and they will no longer have access to QuickService. If the user to be disabled has 'Locked Out' status, reset the password first, then select Disable User. Users can be reactivated by resetting their password.
Customers
View and manage the entities linked to your QuickService portal.
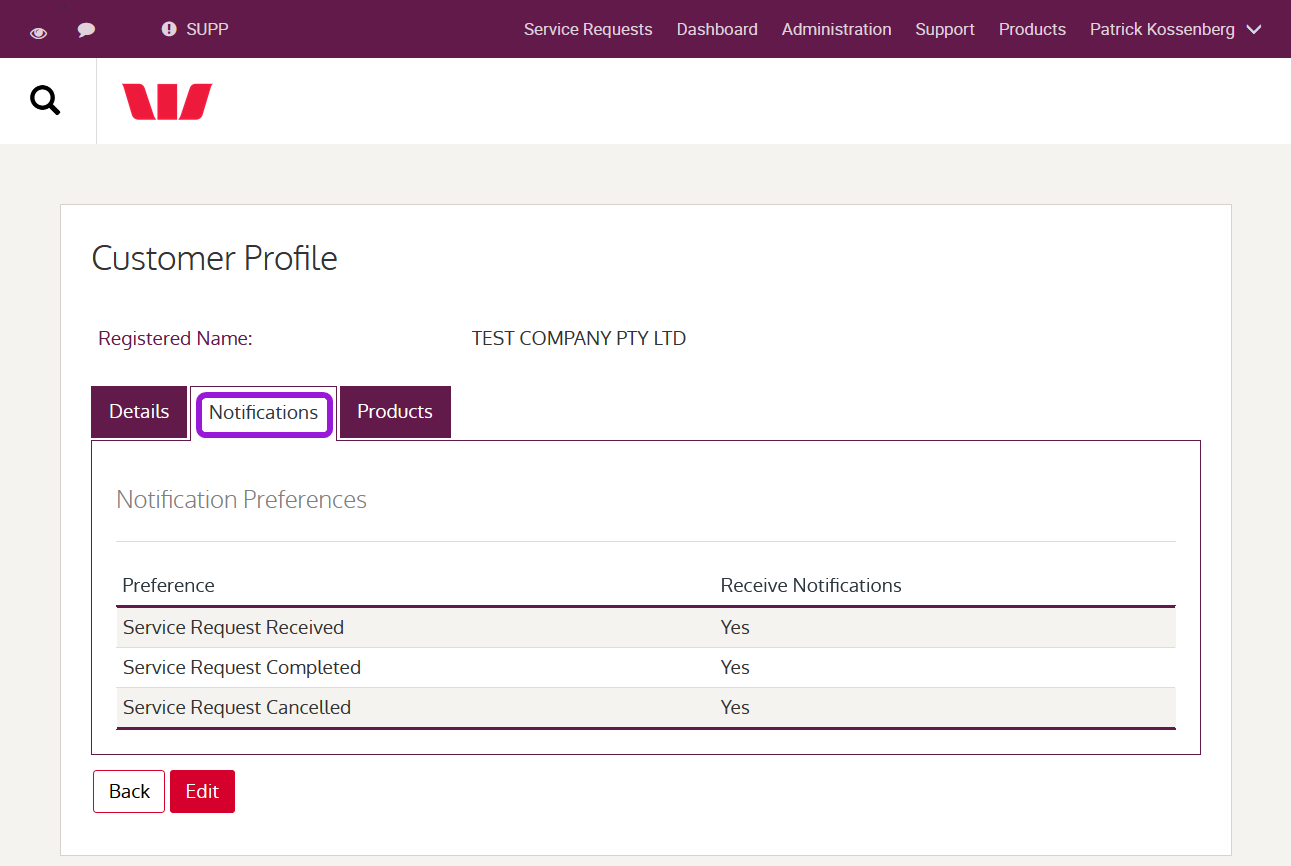
Notifications
To view a customer's profile:
-
Select Organisations in the secondary menu.
-
Select which customer's profile you'd like to view.
-
Select Notifications to view service requests associated with the customer.
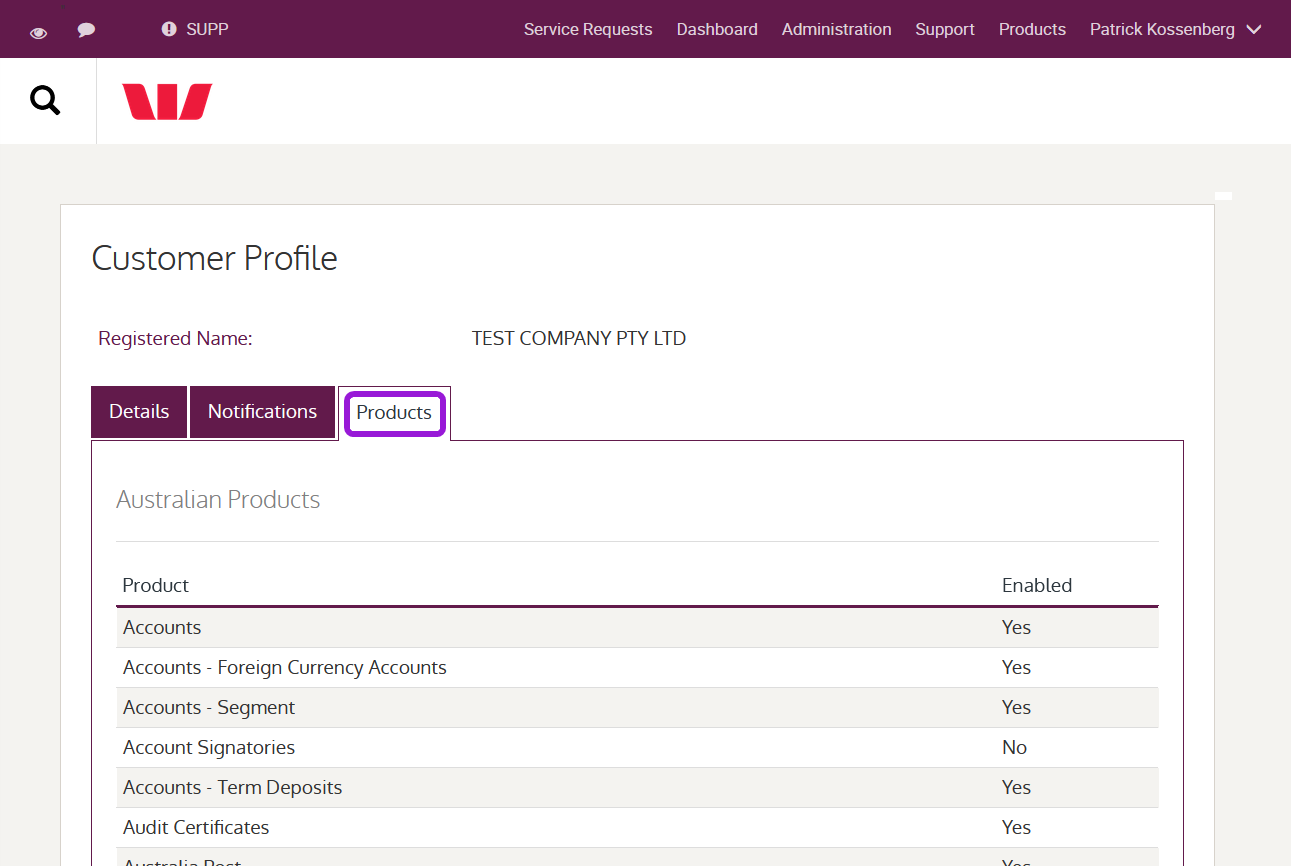
Selectable products and services
Per entity, you can define the list of products and services available to select when creating a new service request.
- Select Organisations in the secondary menu.
- Select Products to view the list of products.
- Select Edit at the bottom of the page to enable and disable access.
- Select Save or Back to return to the previous screen.
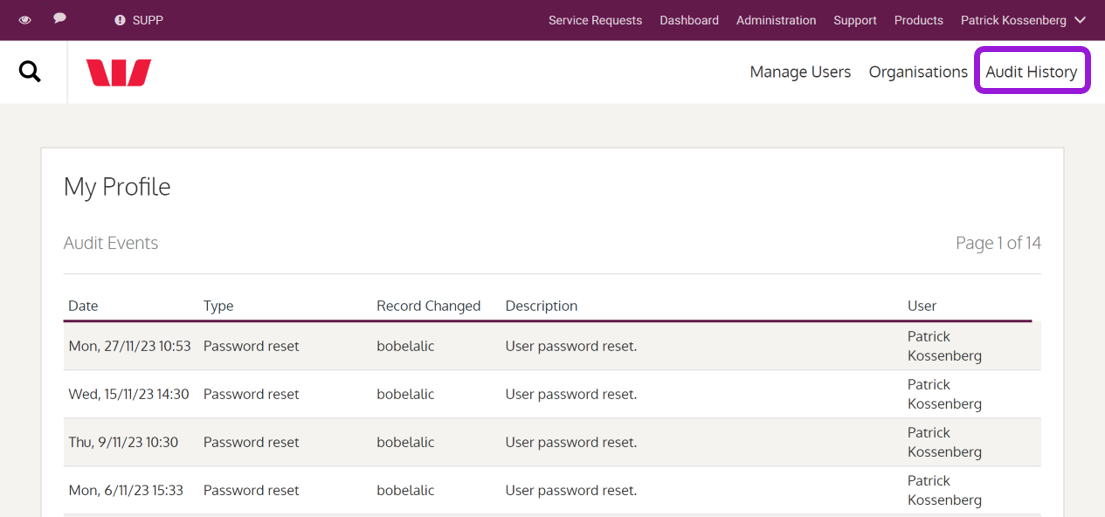
Audit history
Administrators can view any changes to users by selecting 'Audit History'. The following parameters are displayed:
- Date – date the change was actioned
- Type – type of change applied
- Record Changed – the user the change was applied to
- Description – description of the change
- User – the user who made the change.